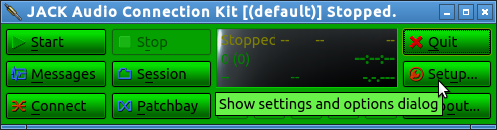
Click on the “Setup” button to configure it, as pointed-to by the cursor in the screen-shot above. A dialog-box will appear that looks like the screen-shot below:
Configuring The Jack Audio-Connection Kit, And Changing Qsynth To Use It
As a cautionary note, you need to be aware that in using JACK (and in configuring your system to use it, or stop using it), there are cases where your system could hang. If this happens, your only choice will probably be to power-down your computer. Where Linux uses a journaling file system, it shouldn't harm your file system.
You find the graphical-user-interface for controlling the Jack Audio-Connection Kit (QjackCtl) in the application menu, under “Sound & Video”, or “Multi-Media”. On Ubuntu-Studio, it's under the “Audio Production” entry in the application menu. Click on it to activate it. You may want to create a launcher icon for it on your desktop, or the panel, but you can always get to it from the launcher menu.
When you launch it, a small window appears for it, but it will not start operating until you configure it. Its window looks like the following (but without my custom blue-green colors):
Click
on the “Setup” button to configure it, as pointed-to by the
cursor in the screen-shot above. A dialog-box will appear that looks
like the screen-shot below:

On
your machine, click the “greater-than-sign” button as pointed-to
by the cursor in the above screen-shot. When you do so, a pop-up menu
will appear, as shown in the screen-shot below:
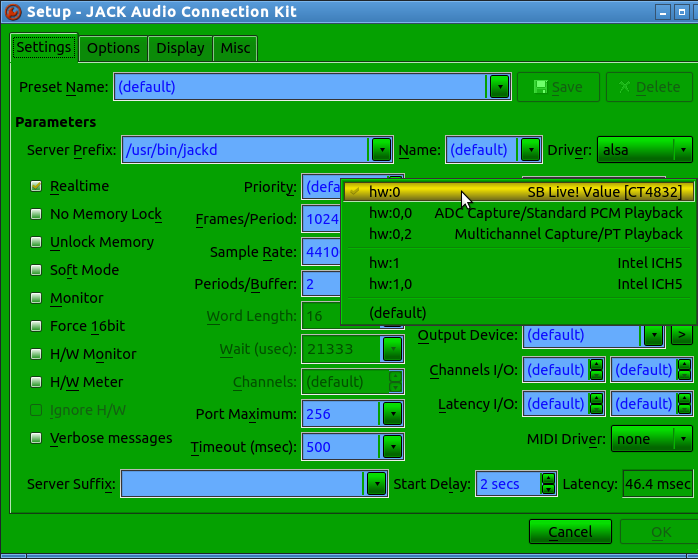
In
my case (above) I have already selected the first entry (hw:0), which
is associated with my Soundblaster Live Value sound-card. Notice that
it already has a check-mark to the left of it. I also have another
sound-card, the Intel ICH5. I could have selected it by clicking on
the 4th entry
(the “hw:1” entry). If you select (click on) “(default)”, it
will always use the
first entry in the list.
Be aware that if you plug in new USB devices to your computer (or un-plug devices you used to use), the order of devices in this list may change, so you may (at that time) need to re-configure the device JACK is supposed to use.
You may want to configure JACK so that it starts working automatically when fire it up from the menu, rather than waiting for you to click its “Start” button (as you will have to do the first time you use it).
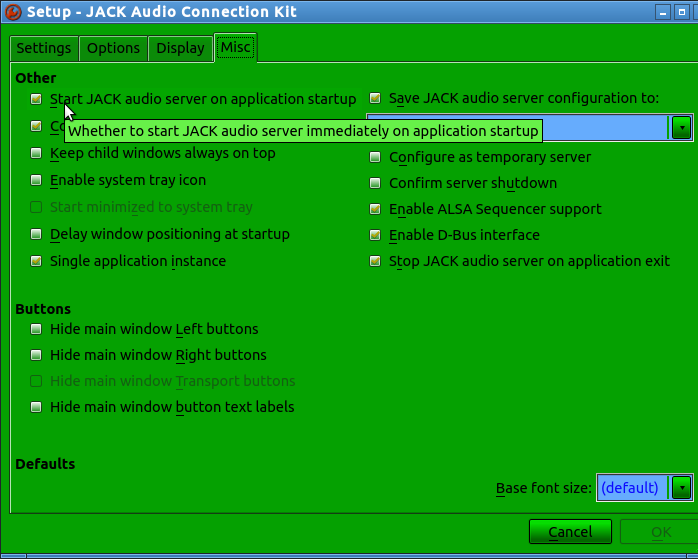
To configure it to start running automatically, click on the “Misc” tab of the Setup dialog, and click-on (so a check-mark appears) the “Start JACK audio server on application startup” check-box, as shown in the screen-shot below:
When
you're done, click on the “OK” button (which will be enabled when
you change something). If you didn't change anything, simply click
the “Cancel” button.
QjackCtl is now configured, and ready to start running. You start it running by clicking the “Start” button, as shown in the screen-shot below:

If
there are errors, you need to address the cause of the error, and fix
it. The most common cause of errors, is having a device configured as
the sound-card that actually isn't the sound-card (such as a USB MIDI
interface, or a USB MIDI keyboard). If that happens, simply configure
the right device (which must actually be a sound-card). You'll have
to answer any error dialog-box that appears, before you can change
the configuration.
For more information on JACK, refer to the JACK Audio Connection Kit web-site at the following link:
JACK Audio Connection Kit Web-Site
To change the configuration to fix errors, click the “Setup” button. After you change it, you'll have to click the “Start” button again.
Assuming it starts running successfully, you are ready to re-configure Qsynth to use JACK.
Changing Qsynth To Use JACK Instead Of PulseAudio
To use Qsynth with JACK, you first need to make these changes. If QjackCtl is already running, you need to terminate it by clicking on its “Quit” button. If you don't do this, you could cause your system to hang.
After making sure QjackCtl isn't running, launch Qsynth. Assuming you have added a 2nd engine to it , you will have to repeat the steps below for that engine as well. Clicking the “Setup” button affects only the currently-highlighted engine-tab's engine.
Click the “Setup” button of the Qsynth window, to change the configuration of the currently-highlighted engine. A dialog-box will appear similar to the following:
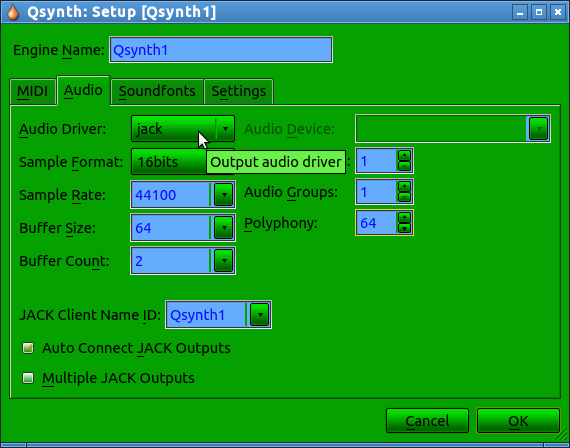
Click
on the “Audio Driver” drop-box, and select its “jack” entry,
as shown in the screen-shot above. Then click the “OK” button.
It will ask you if you want to restart the sound server. Tell it NOT to restart the sound server. If you restart it now, you could hang your system (and lose those configuration changes).
Having done that (if you have an additional Qsynth engine), click on your other engine's tab (highlighting it), and click Qsynth's “Setup” button. Set its “Audio Driver” drop-box to “jack”, as you did with the other engine, and click the “OK” button.
Again, it will ask you if you want to restart the sound server. Tell it not to restart the sound server. If you restart it now, you could hang your system.
Now, click the “Quit” button of Qsynth's window, causing it to exit, with the configuration safely changed.
At this point, you should be able to launch QjackCtl, and when it finishes initializing, launch Qsynth, which should now be using JACK, and therefore will be running much more efficiently.
With Qsynth now depending on JACK, it is important to first bring up (or make sure it's already running) QjackCtl, before bringing up Qsynth. YOU HAVE TO REMEMBER TO DO THIS EVERY TIME YOU USE QSYNTH.
Also, you need to be aware that you can't use the Java Sound (Gervill) synthesizer when JACK (QjackCtl) is running. But where Qsynth is a better synthesizer, you shouldn't need to do this.
At this point, you are done. You can use your browser's “back” button to return to other sections you were reading.