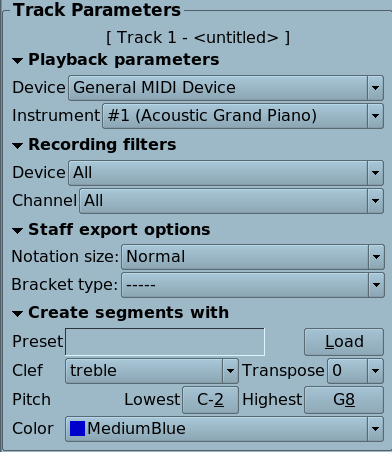


The track parameter box can be found at the left side of the Rosegarden main window. It displays the parameters for the currently selected track. (If you can't see it, try using ->.)
It allows you to assign instruments to tracks, control what incoming MIDI data from which sources will be recorded to particular tracks, control staff attributes (currently only for LilyPond export,) make selections that govern how MIDI segments will be created for each track that is assigned to a non-audio instrument, and apply these selections to existing segments (as when converting a trumpet part from an imported MIDI file to be represented as notation playable by a real human on a real instrument, for example.)
This box is divided into three sections:
These provide an alternative mechanism to the menu-based system of instrument assignment.
These provide you a way to control what events are recorded to this track. If you leave the default values ("all") for both parameters, every received event will be stored in the track. This setting is safe and convenient if you are recording only one MIDI track. Otherwise, you should adjust one or both parameters to select only the desired events for the track.
You can record from only one of the available devices marked for recording in the device manager, or from all of them simultaneously.
You can record from all channels, or limit recording to only one of the 16 available MIDI channels. In this case, only MIDI channel messages matching the channel number will be recorded, and system messages not having a channel (as system exclusive events) will be discarded.
Both parameters are cummulative: you can filter only a device, only a channel, or both a device and a channel simultaneously. It is not mandatory to ensure mutually exclusive selections for all the armed tracks, but if you don't do so you will find duplicated events at several recorded tracks.
The recording filters are also used to route MIDI events to the assigned track instrument when you are recording.
These provide you with a means of exporting notation to render at either normal, small, or tiny size (eg. for printing certain parts at cue size,) and allow you to export a variety of nested brackets.
You are responsible for creating a series of bracket start and end markers that will yield a functional result, and if you make a mistake with these, it is likely that your file will not export or preview correctly in LilyPond.
For a detailed, hands-on demonstration of brackets in action, please see this online tutorial.
These provide you with a means of controlling many of the segment parameters for segments that don't yet exist. They are aimed especially at notation users, and they facilitate operations that require you to use more than one segment on a track (as when using repeats, or alternative endings), by allowing you to create a series of new segments that all have the same properties by default.
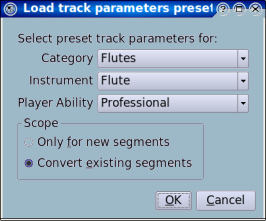
The button launches a dialog that allows you to pick a pre-defined collection of parameters that provide guidelines for how you should write parts for real-world instruments, and optionally convert any existing segments on this track to take on these new parameters.

You first pick a Category, then an Instrument, and finally choose whether you wish to write a part for an amateur or a professional player. [2] The Scope controls allow you to choose whether these parameters will only affect segments that don't yet exist (which you will subsequently record, or draw with the pencil) or should convert any existing segments to take these parameters as well. (For a demonstration of the latter case in action, please see this online tutorial.) Clicking the button injects the appropriate parameters into the remaining widgets in this part of the track parameters box, where you can tweak them if you desire.[3]
Once you have loaded a preset, the name of your chosen preset will be used as the label for any segments you subsequently draw or record on this track, even if you change some or all of the associated parameters away from the values you just loaded.
This lets you choose the clef for any segments you subsequently draw or record on this track. Clefs are events, not properties. Your segments will be created with an initial clef event of the appropriate type (which you may subsequently alter or delete, should you have some occasion to do so.)
The clefs available include a variety of named clefs representing standard clefs with various octave offsets.
This causes segments on this track to be created so that their note events sound at a given transposition. Useful, especially, for writing parts for transposing instruments.
This causes segments on this track to be created using a given colour.
The and buttons, launch a dialog that allows you to pick a pitch using a staff. The lowest and highest pitches you select will then appear right on these buttons.
These represent the lowest and highest playable notes, respectively, on the instrument for which you are writing notation. In some cases, these limits will be hard and fast, like the low B on a Transverse Flute (B foot). In others, they may only serve as guidelines to help you make good choices for instruments with which you are not intimately familiar.
If you enter, record, or import data that has pitches exceeding the values specified, the note heads will appear in red by default. You can turn this behavior off with ->->->